Ta da! I've wrapped up Perfect Treats in time for the weather here in sunny New Mexico to convey unabashed summery exuberance. It's much more fitting to crave a frosty fruit pop now than when we first began.

For those who are late to my large scale (68" x 74" without the optional border, to be exact) popsicle party, it's not too late; you can catch block and assembly instructions in my previous posts:

Fabric Selection & Requirements
Popsicle Block
Push Pop Block

Ice Cream Sandwich Block
Snow Cone Block
Ice Cream Cone Block

Top Assembly

As quilting on my domestic machine is my schtick, and this one is toward the larger end, I left my top in the capable hands of brilliant custom longarmer and Albuquerque, NM local, Tisha Cavanaugh of Quilt Icing.


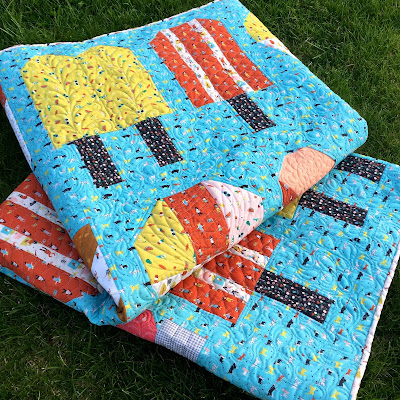
Feathers look lovely on the twin pops.


The push pop was treated (pun intended) to a flowery spiral, wishbones, and straight lines.






For those who are late to my large scale (68" x 74" without the optional border, to be exact) popsicle party, it's not too late; you can catch block and assembly instructions in my previous posts:
Popsicle Block
Push Pop Block

Ice Cream Sandwich Block
Snow Cone Block
Ice Cream Cone Block

Top Assembly

As quilting on my domestic machine is my schtick, and this one is toward the larger end, I left my top in the capable hands of brilliant custom longarmer and Albuquerque, NM local, Tisha Cavanaugh of Quilt Icing.
To avoid thread changes, Tisha chose a versatile blending neutral hue, Aurifil #2846 Iceberg, for the entire quilt.

To give you some ideas for your own Perfect Treat top, I'll give you some closer peeks at Tisha's custom free-motion selections. The popsicle block features ribbon candy and pebbles.

Feathers look lovely on the twin pops.

Straight lines and scallops highlight the ice cream sandwich.

The push pop was treated (pun intended) to a flowery spiral, wishbones, and straight lines.

Snowcones show off cross-hatching, wishbone, and curves.

Spirals and a grid were just the right fit for the the soft serve cone.

FIGO Perfect Day Food Toss in Pink was my backing of choice.

The binding was created from FIGO Perfect Day Pinic in Beige.

I want to thank FIGO, Northcott's modern division, for sponsoring the luxurious fabric resources for this quilt along. Their collections are brilliant for any sewing project, and their quality material has the feel and longevity you want when pouring your time and energy into a labor of love. Check out their upcoming lines, and you'll be all 😍.

I'm going to get back to my wild littles now, because this is what it's all about. I intend for my Perfect Treats quilt to be loved and used, and my boys sure know how to show their appreciation.

I'm linking up with: